Network discovery
Discover and add your network devices to monitor their availability, performance, traffic, and configurations—all from one unified profile. After creating a discovery profile, you can run it on demand, schedule it to automatically search for new devices periodically, or even clone it to create new profiles as your network evolves.
Check out this video to know more about discovery profiles and reports:
Use case
An organization spanning multiple locations can simplify their network discovery process by creating a single network discovery profile and cloning it to run for different IP addresses. They can also schedule network discovery simultaneously to rediscover and add new devices for monitoring. This approach eliminates the need to add a device separately for each type of monitoring, saving a significant amount of time and effort.
The benefits of creating a single network discovery profile are:
- Centralized device discovery
- Comprehensive inventory management
- Consistent monitoring
- Improved security and compliance
Adding a network discovery profile
- Log in to your Site24x7 account.
- Navigate to Network > Network Discovery.
- Click the plus icon + beside Discovery Profiles or click Add Discovery Profile in the top-right corner.
- In the Network Discovery page that opens, select an On-Premise Poller on the same network as your device(s). You can also add a new On-Premise Poller by clicking Add a new On-Premise Poller in the bottom-left corner.
NoteThe On-Premise Poller that you select should have the Network Module enabled.
- Click Next.
- Provide the following details in the Discovery Details section:
- Discover: Toggle to select Network, Device, or via CSV as needed.
- Discover Network: If you have selected Discover Network in the first step, enter the following values:
- Discovery Name: Provide a meaningful and unique name to identify the Discovery Profile.
- IP Version: Toggle between IPv4 or IPv6, as needed.
- IP Range: Provide the start and end IP addresses along with the network mask or provide the CIDR value in the next field.
- CIDR: Provide the network IP and the maskbit value.
- Discover Servers: Toggle to discover.
- Enable NetFlow: Toggle to enable network traffic monitoring.
- Enable Network Configuration Management (NCM): Toggle to enable NCM. Then, select a value for Check Frequency, which is the frequency at which the device configuration backups will be taken.
- Discover Device: If you have selected Discover Device in the first step, enter the following values:
- Display Name: Provide a name to identify the device.
- Hostname/ IP Address: Enter the hostname or IP address of the device that needs to be monitored
- Device Template: Toggle between preexisting Default Templates or user-created Custom Templates. Then Select Category of the device. Then, Select Template.
- Enable NetFlow: Toggle to enable network traffic monitoring.
- Enable Network Configuration Management (NCM): Toggle to enable NCM. Then, in the Select NCM Device Template section, select Vendor, Template, and Protocol from the respective drop-down menu.Then, select a value for Check Frequency, which is the frequency at which the device configuration backups will be taken.
- Discover via CSV: If you have selected Discover via CSV in the first step, enter the following values:
- Discovery Name: Provide a meaningful and unique name to identify the Discovery Profile.
- Upload File: Click Browse to select a TXT or CSV file that contains the details. You can also download a sample file to check and review the format by clicking the Download Sample File option below the field name.
- Auto-discovery: Toggle to discover and add devices automatically for monitoring once the discovery profile is executed.
- Enable NetFlow: Toggle to enable network traffic monitoring.
- Enable Network Configuration Management (NCM): Toggle to enable NCM. Then, select a value for Check Frequency, which is the frequency at which the device configuration backups will be taken.
- Credentials: Select credentials that will be used for monitoring the network using various protocols such as SNMP, SSH, TELNET, and WMI, as needed. You can also Add New Credential from the drop-down menu.
NoteFor successful data collection, the right credentials with the correct values must be selected.
- In the Filters section:
- Select an existing filter and edit it by clicking the pencil icon, or delete it by clicking the trash icon
 .
. - In Interface Filters, add a new one by clicking Add Filter. In the Add Network Discovery Rule pop-up, enter the following details:
- Rule Name: Provide a unique name for the rule.
- Description: Provide a description to explain the rule.
- Interface Type(s): Select a value from the drop-down menu.
- Admin State: Select one or more options from Up, Down, or Testing in the drop-down menu.
- Operational State: Select one or more options from Up, Down, Testing, Unknown, or Dormant in the drop-down menu.
- Interface Name: Toggle between Any of these Conditions (OR) or All of these Conditions (AND). In the drop-down menu, select a condition, and in the field beside it, provide a value. Click the plus + icon to add more conditions.
- Click Save Rule.
NoteIf you have selected Device or via CSV in step 6a, then only Interface Filters will be displayed. However, if you have selected Network in step 6a, then Device Filters will also be displayed along with Interface Filters.
- If Device Filters is available,
- Provide values for:
- Action: Select Add or Ignore in the drop-down menu
- Type: Select an option from IP Range, IP Address, Category, Device Type, and Device Name in the drop-down menu.
- Condition: Select between Equals or Contains. The options vary based on the Type selected in the previous step.
- Value: Provide a value according to the selected Type.
- Click the plus icon + to add a new filter.
- Click the trash icon to delete a filter
- Provide values for:
- Select an existing filter and edit it by clicking the pencil icon, or delete it by clicking the trash icon
- In the Advanced Settings section, the default values will be selected. Expand the form to edit the existing values for the following fields:
- Threshold and Availability: Select a Threshold and Availability Profile from the drop-down menu.
- Tags: Select zero or more existing tags or add a new one by clicking the plus icon +.
- User Alert Group: Select zero or more user alert groups.
- On-Call Schedule: Select an on-call schedule to alert users in specific shifts; edit an existing one by clicking the pencil icon
 or add a new one by clicking the plus icon +
 - Notification Profile: Select a notification profile from the drop-down menu; edit an existing one by clicking the pencil iconor add a new one by clicking the plus icon +
- Services: Select an option if you wish to integrate Site24x7 alarms to a preferred third-party service.
- Click Save to save the profile and run it as required. You can also select Save and Start Discovery or Save and Schedule from the drop-down menu.
Viewing network discovery profiles
- Navigate to Network > Network Discovery.
- All the discovery profiles that you have added will be displayed on the Discovery Profiles screen.
- View the discovery profile Name, Location Profile, Last Execution Time, Status, and Action.
- In the Action column, you can:
- Run a discovery profile by clicking the play
 icon. View the details in Discovery Reports.
 - Stop the execution if you see a stop icon
 .
. - Schedule by clicking the clock icon
 .
. - Clone by clicking the copy icon
 .
. - Delete by clicking the trash icon.
- Run a discovery profile by clicking the play
Discovery Reports
As soon as a Discovery Profile is run in step 4a of the Viewing network discovery profiles section, a Discovery Report is generated. This contains the details of all the Network Devices, Server - Agentless, and Unknown Devices.
- Navigate to Network > Network Discovery > Discovery Reports.
- Click the required report to open it. You can also open the report in a new tab by clicking the open icon
 or delete the report by clicking the trash icon .
 - After opening a report, in the Discovery Details section at the bottom-left corner (Fig. 2, marked as 1), you can view the conditions for device discovery.
- Click Add Filters (Figure 1, marked as 2) to filter the discovered devices based on Credential Type, Network Status, NCM Status, NetFlow Status, and Category. You can select multiple filters at once.
- Click Bulk Update to update Network Credential, Network Template, NCM Credential, or NCM Template in bulk. In the Bulk Update pop-up that opens:
- Select a Credential or Template based on the option that you have selected. Fig. 1 shows a bulk update of a network credential.
- Select the required devices in the Select Device(s) section and click the right-arrow icon highlighted in Fig. 1. The selected devices will be displayed in the Bulk Update: Selected List section on the right side.
- You can remove any record on the selected list by clicking the x icon beside the record.
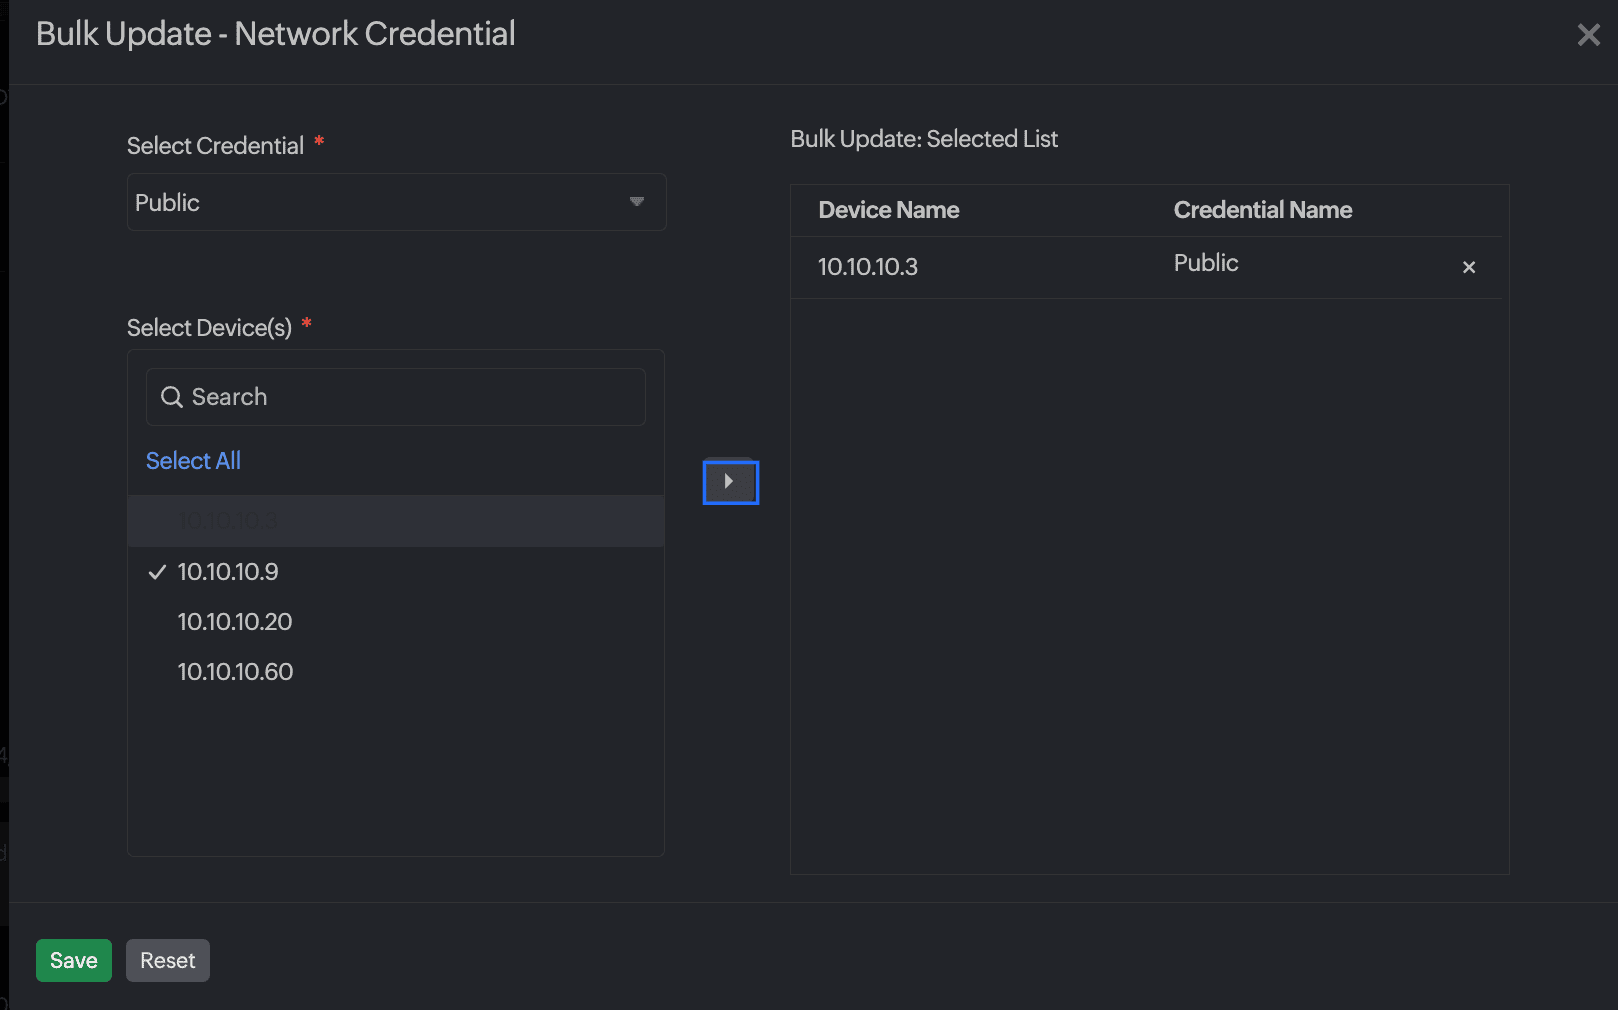
Figure 1. Bulk Update.
- Click Export as CSV to export the report as a CSV file (Fig. 2, marked as 4).
- You can view the status of a device in the Monitor Status column. You can click the plus icon + (Fig. 2, marked as 5) beside an unmonitored device to start monitoring it.
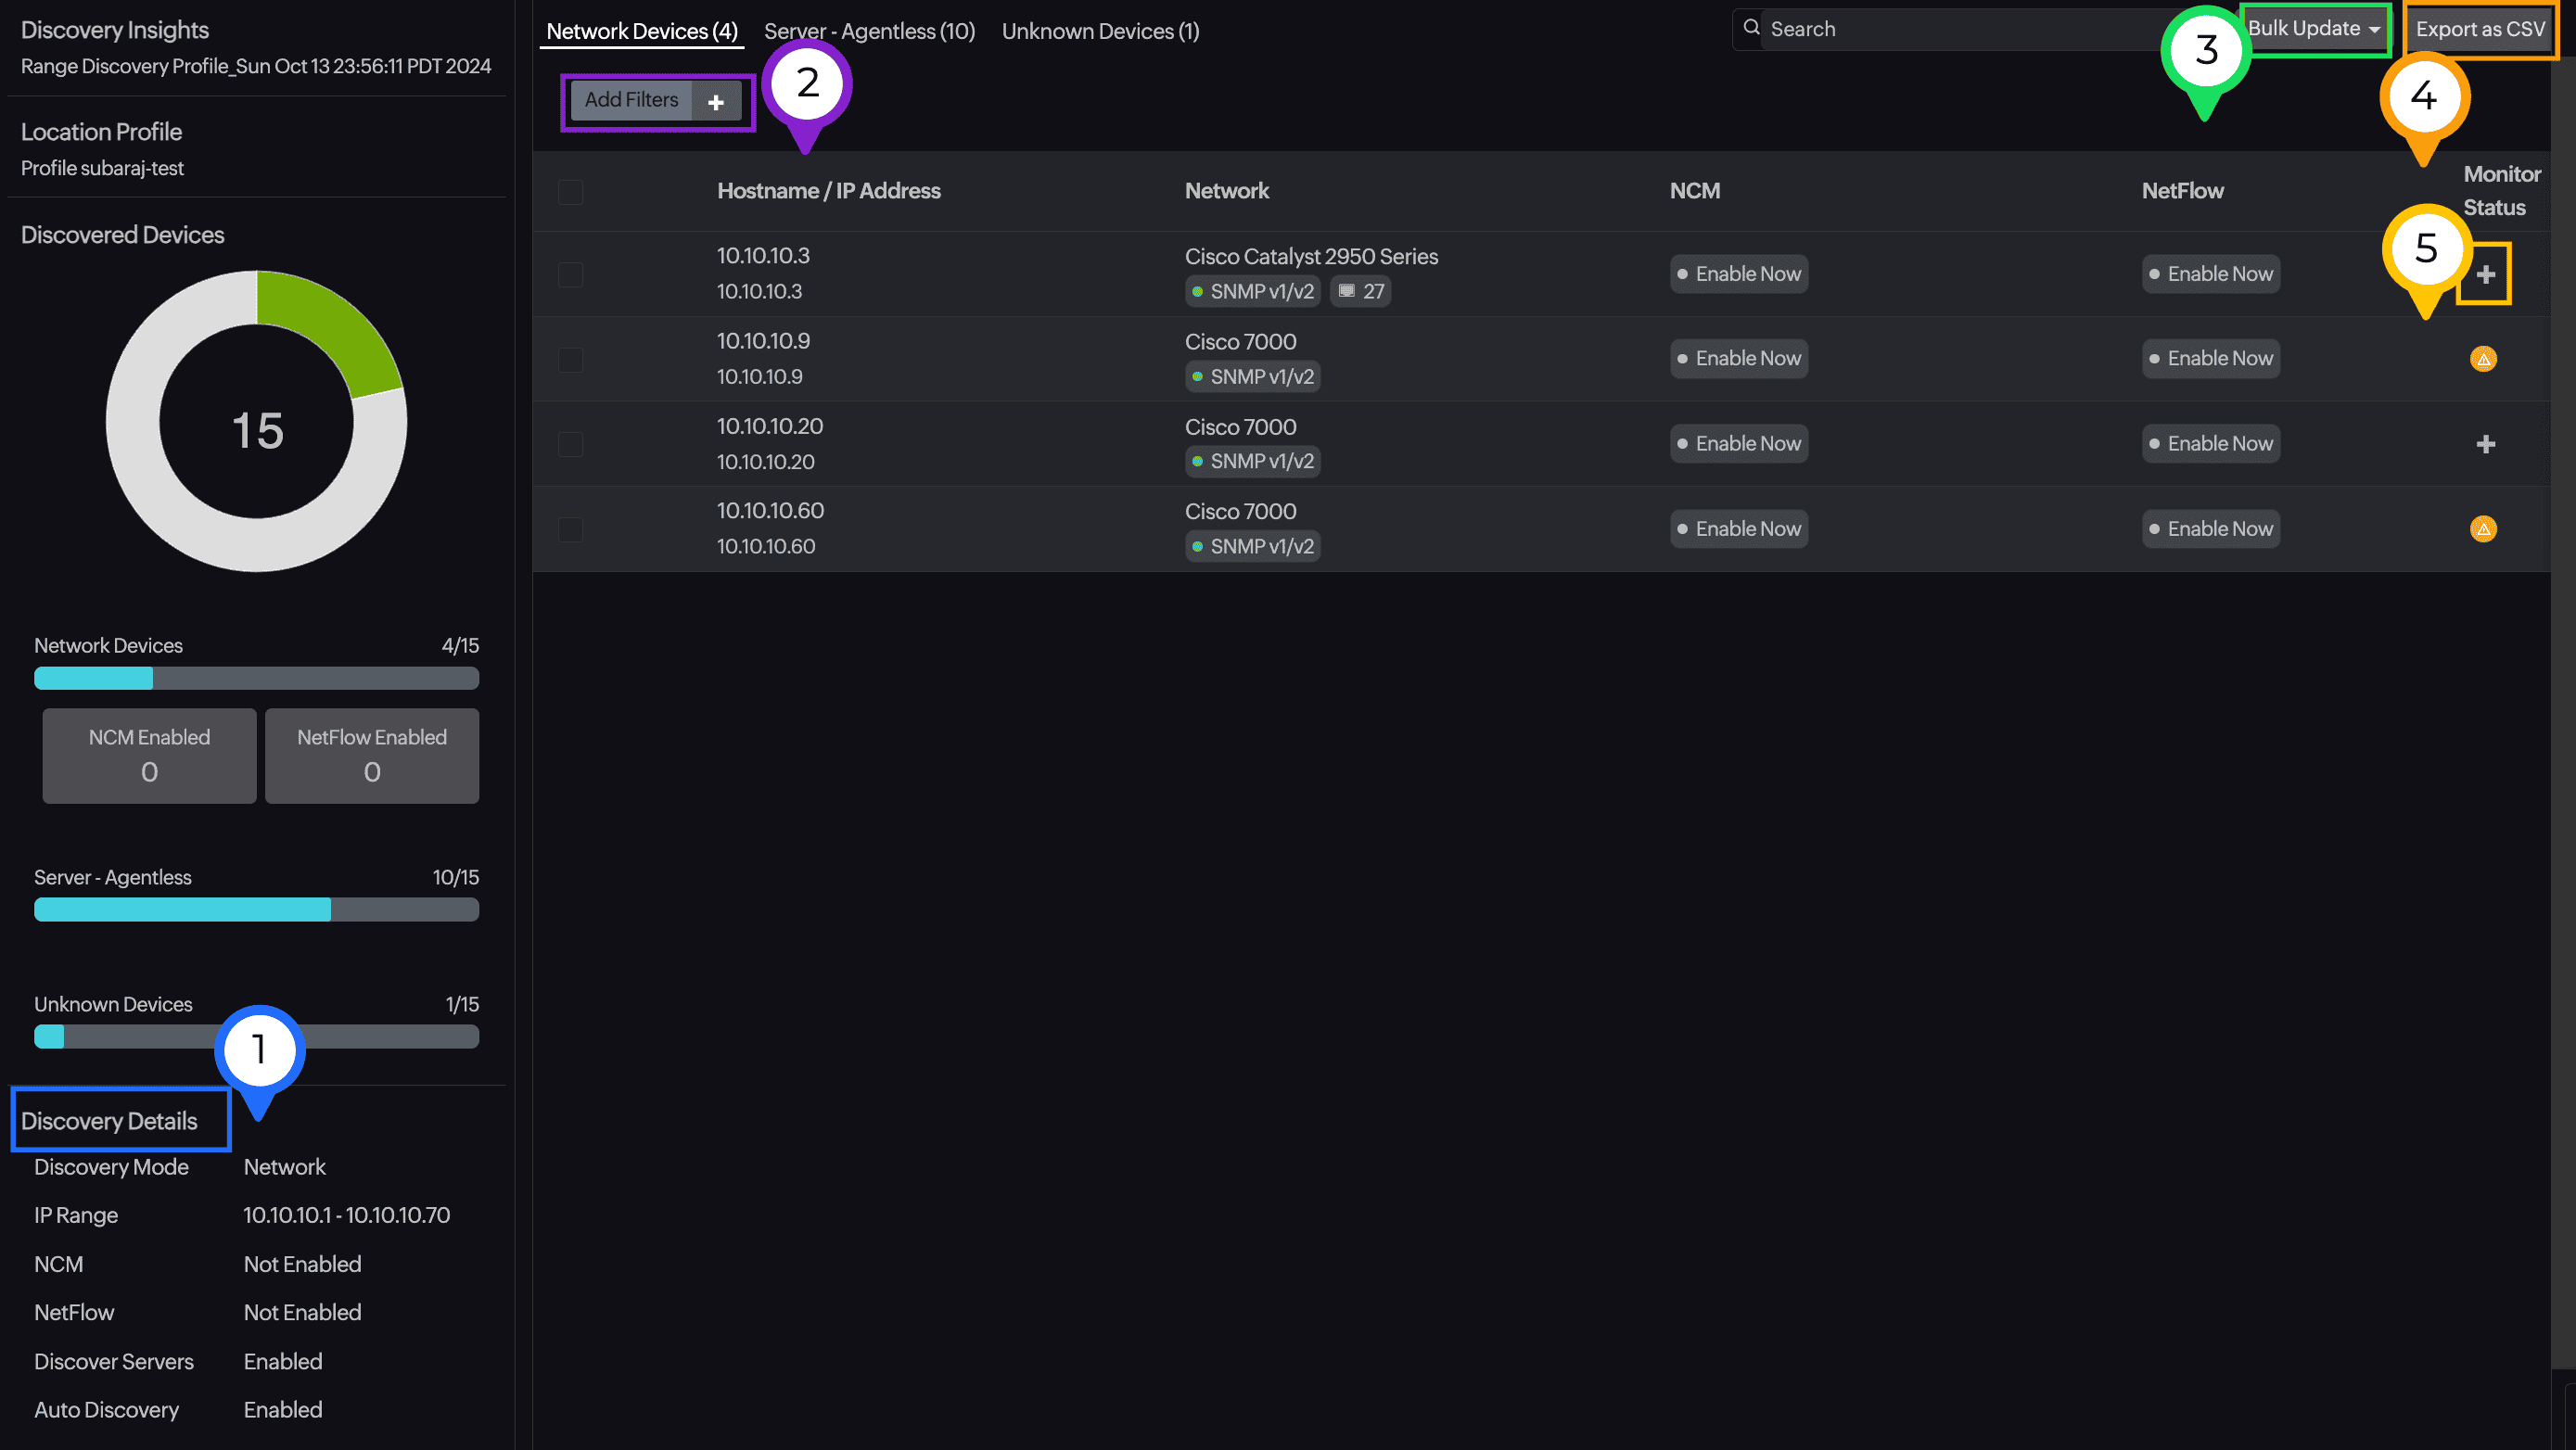
Figure 2. Discovery Reports.