Integrate your AWS services with Site24x7
To monitor your AWS infrastructure and managed services, you need to create an AWS monitor in the Site24x7 console. As part of the setup, you first need to enable Site24x7 ReadOnly access to the various AWS resources running in your Amazon Web Services (AWS) account. This can be accomplished by two different ways.
You can either create a cross-account IAM role between your account and Site24x7's AWS account (or) create Site24x7 as an IAM user (authentication by security credentials). Once you are done, log into the Site24x7 console paste the Role ARN (or) security credentials in the Integrate AWS Account form to enable the AWS integration.
If you have already generated the security credentials (Secret Access Key and Access Key ID) or Role ARN, you can skip to the "Connect your AWS account section" if not, please follow the steps mentioned under the "Enable Site24x7 access to your account" section.
Enable Site24x7 access to your account
- To create a cross account IAM role between your AWS account and Site24x7, refer our product documentation.
- To create Site24x7 as an AWS IAM user, refer our documentation.
Connect your AWS account with Site24x7
- IAM role-based cross account authentication
- CloudFormation IAM role-based access
- AWS Control Tower lifecycle events-based access
- AWS IAM Identity Center-based access
- Delegated Admin-based access
- IAM user key-based authentication
- Advanced discovery options
- Exclude/include AWS resources using tags
- Configure notification profile,user groups, and thresholds
- Discover AWS resources
- Disable services from discovery
- Remove AWS account from Site24x7
Connect your AWS Account via Role-based Authentication
Once you have created the IAM role, navigate back to the AWS Identity and Access Management (IAM) console.
- In the navigation pane, click on Roles
- Using the filter tab, search for the IAM Role you created using the Role name parameter.
- Click on the Role, to view the Role summary
- The summary will contain the Role ARN.
- Now, login to the Site24x7 web console.
- Click AWS > Integrate AWS account
- Select the AWS account type - Global region, GovCloud (US) or China region.

The account type should be the same as where you created the IAM role. For example if you've created an IAM Role in the GovCloud (US) account, switch the account type tab from Global to GovCloud (US).
- Select the integration method as Single Account. The Select Integration Method field lets you choose how to connect your AWS account with Site24x7. You can select your desired integration method.
Depending on whether you are integrating a single AWS account or multiple accounts, the available deployment methods change.- If you choose Single Account as the integration method, you can deploy using one of these methods:
- Register with CloudFormation
- Register with IAM Role
- If you choose Multiple Accounts, the following deployment methods become available:
- Register with Control Tower
- Register using AWS IAM Identity Center
- Register with Delegated Admin
- If you choose Single Account as the integration method, you can deploy using one of these methods:
The Select Integration Method option is available only for Global and China AWS account type.
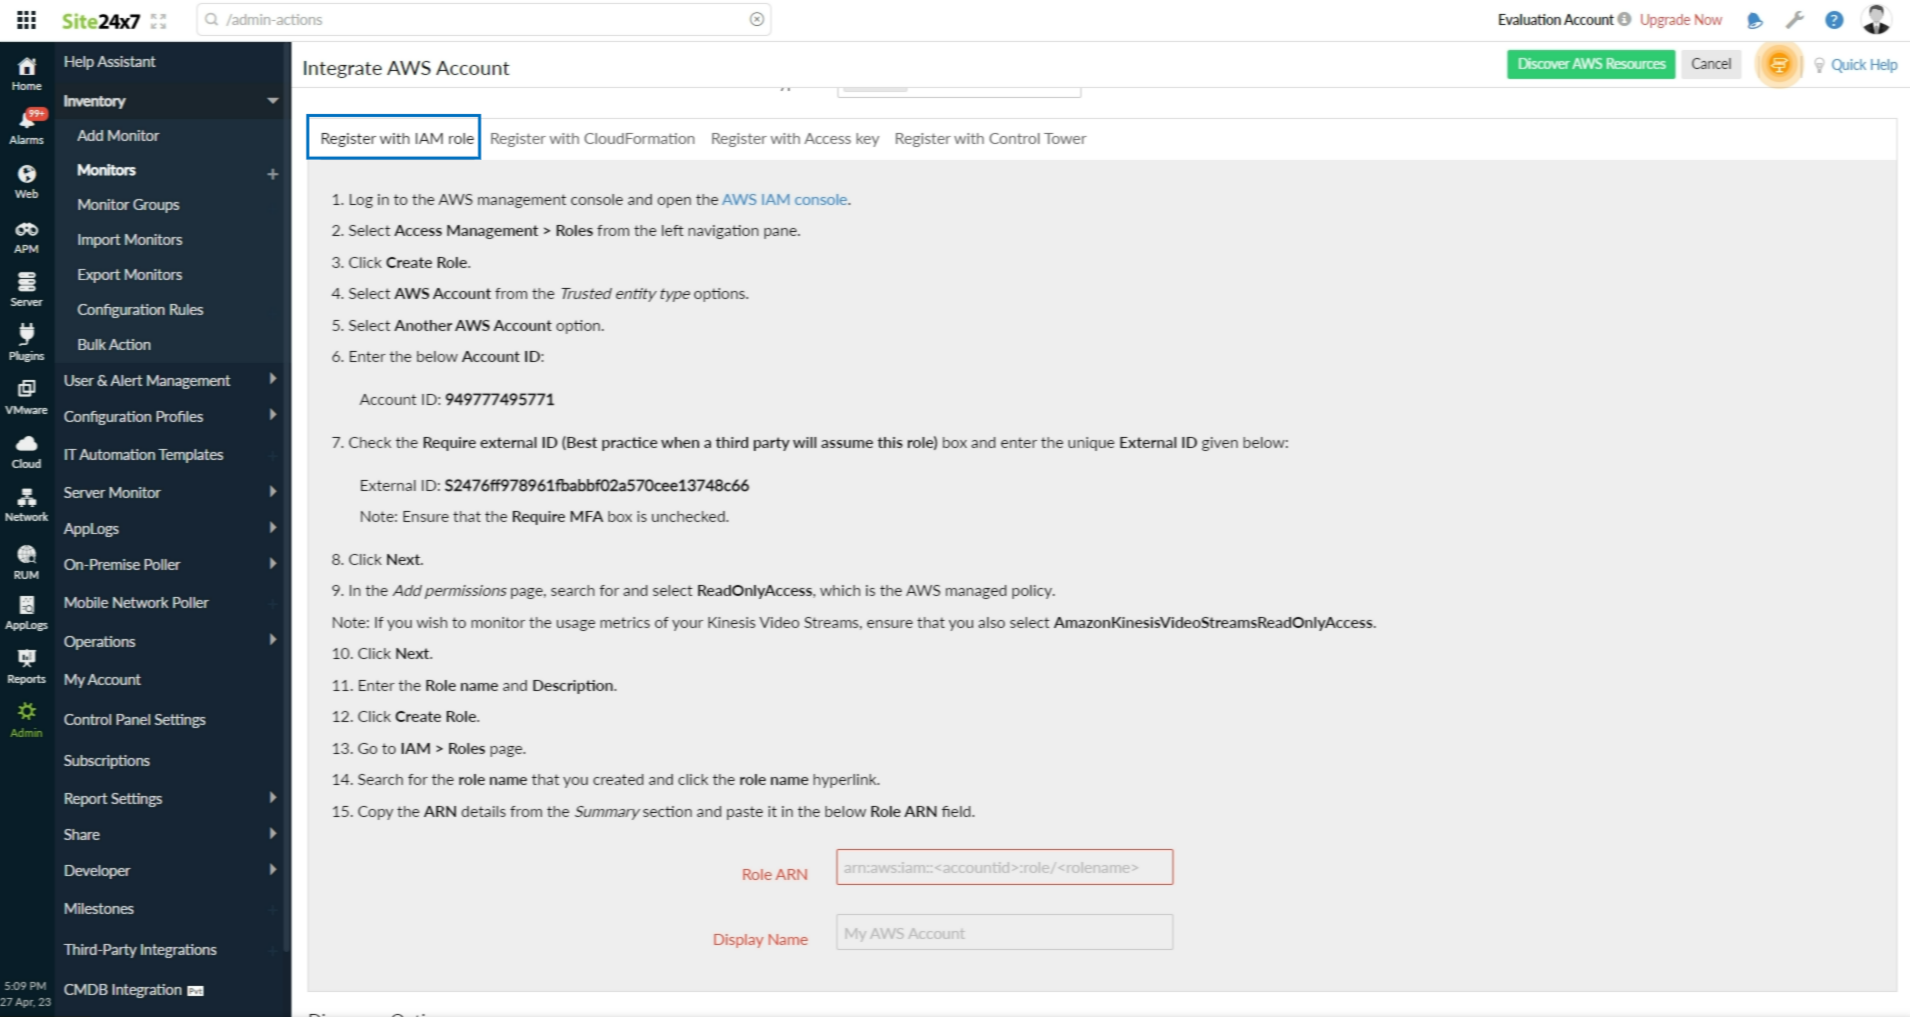
- Select Register with IAM role. In the Register with IAM role tab specify the following details to connect your AWS account with Site24x7:
- Role ARN: Copy and paste the Role ARN of the cross-account IAM Role you created for Site24x7.
- Display name: Provide an appropriate label for your AWS account
CloudFormation IAM role-based access
You can enable access to your AWS resource by creating an IAM role-based access for Site24x7. You can automatically create an IAM role with a CloudFormation template. Learn more.
AWS Control Tower lifecycle events-based access
You can enable access to your existing and new AWS accounts with AWS Control Tower lifecycle events and automatically discover all the accounts in your organization to be integrated with Site24x7.
AWS IAM Identity Center-based access
AWS IAM Identity Center enables access to your AWS accounts with a consistent single sign-on experience and helps to integrate multiple AWS accounts with Site24x7.
Delegated Admin-based access
You can enable access to your AWS accounts with a Delegated Admin and automatically discover all the accounts in your organization to be integrated with Site24x7.
Connect your AWS Account via Key-based Authentication
This authentication method is deprecated. Please use the role-based authentication method to monitor your AWS resources.
Once you have created Site24x7 as an IAM user and downloaded the security credentials (Access Key ID and Secret Access Key) follow the below mentioned steps to create and AWS monitor:
- Login to Site24x7 web console.
- Click AWS > Integrate AWS account
- Here, select the AWS account type based on where the infrastructure and services you want to monitor are deployed (Global region, GovCloud (US) or China Region)
- Switch to the Register with Access Key tab and specify the following details to enable the AWS integration
- Display name: Provide an appropriate label for your AWS account
- Access Key ID: Copy and paste the Access Key Id
- Secret Access Key: Copy and paste the Secret Access Key.

Discovery options
Advanced configuration
Configure default threshold profiles for each supported AWS service, mute resource termination alerts, automatically create monitor groups using native AWS tags, customize the Guidance report and more. Get detailed information by visiting our help documentation.

Services to be discovered
Select the AWS service you wish to monitor from the appropriate box in the monitor. Site24x7 will only discover the various instances of the said service.
Rediscovery interval (Interval for polling your AWS account to detect new changes)
Site24x7 needs to query the AWS service, to get a near real time status and view of the various infrastructure components present in your AWS account. So any changes occuring in your AWS environment – new instance provisioned, instance terminated, DB table name modified, new topic created, etc. can be detected and reproduced in the Site24x7 console. Rediscovery interval will determine the frequency at which these checks get performed. By configuring, you can schedule a rediscovery to occur at regular intervals.
Currently our AWS infrastructure monitoring supports the following polling methodology according to region:
- Default Polling: Regions with Amazon services will be polled every 5 minutes, and for other supported regions polling interval will be 1 hour.
- Fewer Polling: Regions with Amazon services will be polled every 5 minutes, and for other supported regions polling interval will be 6 hour.
- Never: No rediscovery will be made for any Amazon service at any region. The user will have to use the "poll now" option to initiate rediscovery.
*other supported AWS services: RDS, DynamoDB, SNS, S3, ELB (Classic, Application and Network), Lambda, ElastiCache, SQS, Kinesis services (Data Streams, Video Streams, Firehose and Analytics), Elastic Beanstalk, Direct Connect, VPC-VPN connection, API Gateway, Elastic Container Service (ECS), Redshift, Elastic File System (EFS), Simple Email Service (SES), CloudFront, Lightsail, WorkSpaces, Elastic Kubernetes Service (EKS) and many more.

A couple of important points to be kept in mind, while configuring
- Rediscovery interval is the amount of time spent between querying your AWS account.
- If you want to discover changes made to your AWS environment with immediate effect, you can use the Poll Now option
- Rediscovery for attached EBS volumes will happen along with EC2 instances, So any volume resizing changes made will be reflected within 5 minutes.
- The performance metric polling interval applicable for various supported AWS services won't be affected by the rediscovery polling interval. By default it will always be 5 minutes.
You can either initiate a AWS account level Poll Now (Navigate to the Inventory Dashboard of the monitored AWS account > ![]() > Poll Now.) or initiate a individual AWS resource level poll now (Navigate to the monitor summary page >
> Poll Now.) or initiate a individual AWS resource level poll now (Navigate to the monitor summary page > ![]() > Poll Now.)
> Poll Now.)
Filter AWS resources
By default, Site24x7 discovers all supported AWS resources mentioned in the policy statement. If you want to limit or reduce the CloudWatch API requests made, or if you want Site24x7 to discover and monitor distinct resources running in your production/test environment, you can use our tag-based filtering feature to include or exclude any subset of an AWS service.
The Include and Exclude tags can be used with custom tags in an AND/OR logical operation. If both Include and Exclude tags are used to filter the AWS resources, the Include tags search will be performed first followed by the Exclude tags operation.

As of now, you can use system attributes (Region, VPC ID) and tags defined at AWS console (key-value pairs) to filter which AWS resources get included during AWS infrastructure monitoring.
Major points to keep in mind before you begin:
- You can configure any number of tags in the Site24x7 console at a given time.
- Both filtering options, Include and Exclude, can be used simultaneously for various tags except for the Region tag.
- The AND/OR logic can be performed only when you enter more than one tag in the Include or Exclude section.
- System attributes—Region, VPC id, and user-defined tags—are applicable for both include and exclude filtering options.
- All the basic restrictions that apply for user-defined tags in the AWS console, like key length, character length, and case-sensitive nature, are applicable here as well.
Tag Relevance
The above mentioned Include/Exclude/AND/OR tags may not be applicable for each AWS resource available. Two things to consider for tag relevance are:
- No tag support: A few AWS services may not support tags in general. These AWS resources are discovered automatically, regardless of any specific filter tag added.
- Global region support, No VPC ID: When you type $ in the "key" field to search for default tags, "REGION" and "VPC ID" are the default suggestions. Default tags can't be used when an AWS resource has global region support extended and no VPC id associated to it. In such a case, only the key-value mentioned in the Include/Exclude section will be considered.
- Whatever tag is given, the tags will not be considered if it isn't applicable for an AWS resource.
- The AWS resources that are currently being monitored, can't be excluded by configuring tags. For Site24x7 to exclude/include resources, the tags must be configured before initiating Auto Discovery or the tagged resource must be a new instance which has not been discovered yet. For example, consider a scenario where you want to exclude a group of 5 instances which were launched in a specific VPC. But these resources have already been discovered and are currently being monitored. Configuring a exclude tag now with the key $VPC and value "VPC ID" won't help you filter these resources. These resources can only be excluded by suspending the said monitors from the Site24x console.
Exclude/Include Resource From Discovery
Filter your AWS resources for exclusion and inclusion in Site24x7 based on tags.
System attributes (Region)
Use existing system attributes to filter resources from being discovered. Currently AWS resources tied to a specific Region or instances launched in a particular VPC platform can be excluded from being discovered.
- In the “Integrate AWS account” page, select the Exclude tab under the "Exclude AWS Resources based on Tags" section for excluding tags.
- Type $ in the “key” field to search for available tags, select “REGION” from the suggestion. Click on the drop down in the “value” field to view options. Here you can select your regions. Based on your selection, the resource hosted or launched in that specific region will be excluded from discovery. There is no need to configure the “Region” tag several times, you can select multiple regions in a single go.
- You can also use the AND/OR logic for the tags intended to be excluded.

System attributes (VPC ID)
- In the “Integrate AWS account” page, select the Exclude tab under the "Exclude AWS Resources based on Tags" section for excluding tags.
- Type $ in the key field to search for available tags, select “VPC” from the suggestions. Type in the VPC ID in the “value” field. The resources launched in the particular VPC platform will be filtered during discovery.
- The logical operation AND/OR can also be performed on the tags.

User defined tags
The tags you have configured to group various resources based on the owner, purpose, environment or any other criteria can now be used in the Site24x7 console to filter resources from being discovered.
For example lets a take a scenario where you've assigned two tags to two different groups of EC2 instances, one is called "Environment" and the other is called "Role", each has a value "Development" and "Webserver" associated with it and you want to filter these instances from being discovered.
- In the “Integrate AWS account” page, select the Exclude tab under the "Exclude AWS Resources based on Tags" section for excluding tags.
- Type in the proper key-value pair to match the tag(s) you created in your AWS account.
- If you want to add a key-value pair through an API request, the format to add one is: [{"name":"environment","value":"production"},{}....]
Regex support
Regular expression or regex is also supported for key values. To explain this lets take another example, imagine that you have assigned the tag "Owner" with multiple values - say "DBadmin", "DBtest" and "DBuser" for different groups of RDS instances and want to exclude them from discovery. Instead of configuring tag key-values multiple times in the Site24x7 console, you can easily use "DB.*"(regex) to filter out all the said resources in one go.
Type the correct regex to match the tags you have configured in your AWS console.

When using regex please ensure the value string gets appended with .* in the end. Site24x7 will match the start and end of the string, contained within .*
The above mentioned example would match any key-value pair (e.g., owner = DBusergroup, owner = DBadmin) as long as DB.* gets followed.
Site24x7 custom tag
You can also assign your resources with the custom tag key "monitor_site24x7" and set its value as false in AWS console. The resources that have this tag and value will be ignored during auto discovery. You can revert this behavior by removing the tag from the resource.
When the custom tag (monitor_site24x7) has its value set as false in the AWS console, this tag will be given priority over all other user-defined tags created. In such cases, even when an Include and Exclude tag can be added to an AWS resource, the Include/Exclude/AND/OR logic cannot be supported.
An important point to note is, the tag must be configured before hand. To do this, log into your Amazon Management console, navigate to the dashboard of the service you want to tag, select the resource and add the tag. Once you are done, you can navigate back to the Site24x7 console and configure the custom tag key and value in the field provided.
Editing the advanced discovery options
Editing the "Services to be discovered field"
When you navigate to the edit section of the monitored AWS account, you'll see that the various AWS services for which you have provided ReadOnly access will be checked in the "Services to be discovered field"
Unchecking a selected AWS service will ensure that no further rediscovery occurs for the said service. For example, consider a scenario where you want Site24x7 to stop discovering and adding newly created SNS topics, instead of editing the permissions present in the custom policy JSON, you can navigate to the edit section of the monitored AWS account and uncheck SNS topic from the services to be discovered field.
Editing the rediscovery polling interval
The rediscovery polling interval can be edited at any point in time. Once done, the newly configured polling frequency will become applicable for successive polls.
Configuring new tags in the edit section
- If no tags (for both exclude and include) had been configured then the key and value field under the "Exclude/Include AWS resource" section will be empty.
- The AWS resources that are currently being monitored, can't be excluded by configuring tags. For Site24x7 to exclude/include resources, the tags must be configured before initiating Auto Discovery or the tagged resource must be a new instance which has not been discovered yet. For example, consider a scenario where you want to exclude a group of 5 instances which were launched in a specific VPC. But these resources have already been discovered and are currently being monitored. Configuring a exclude tag now with the key $VPC and value "VPC ID" won't help you filter these resources. These resources can only be excluded by suspending the said monitors from the Site24x console.
- When tags are assigned to a particular type of Amazon account, it will be applicable for all the resources in the account.
Configure notification profile, user groups and thresholds
- Notification Profile: Notification profile decides when and who needs to be alerted in case of a threshold violation. You can either edit the default or system generated notification profile or create a new one yourself. If you already have a notification profile configured you can select it from the drop down. Refer Notification Profile to create a customized notification profile.
- User Groups: Select the user group that need to be alerted during an outage. To add multiple users in a group, see User Groups.
- Threshold Configuration: Refer configuration profile setup for EC2, RDS, S3, DynamoDB ,Classic-ELB, Application-ELB, Network-ELB, Lambda, ElastiCache, SQS, SNS topics, Kinesis services, Elastic Beanstalk , VPC - VPN connection, Direct Connect, API Gateway and CloudFront to set up individual thresholds for each performance metric.
- Tags:These tags are assigned at an Amazon account level.
- Third Party Integrations: You can also associate this monitor with a third party alert or ticketing service. With this you can push your alert notifications to the selected service and facilitate improved incident management. To setup third party integrations, navigate across to ”Admin > Third Party Integration” in the Site24x7 console. To learn more about the various supported third party integrations, refer our documentation.

Discover AWS Resources
Once you click the Discover AWS Resources button, you'll be taken to the AWS resource discovery page. You can either stay on the page to view the discovered resources or explore our other monitoring capabilities. Site24x7's intuitive wizard takes over and detects all available resources of various supported services currently running in your AWS account.
The following User Interface(UI) changes will also occur:
- The AWS icon in the dock (left side pane of the Site24x7 client) will be automatically selected and the recently added AWS account will be displayed below the “Integrate AWS Account” option.
- A drop down menu listing the various supported AWS services along with the Infrastructure and Inventory Dashboard will also be automatically activated for the recently added AWS account.
- Once the discovery process is over, the individual AWS resources discovered will get listed in the AWS resource discovery page.
The discovery wizard simultaneously detects and displays all the publicly available domains hosted on Amazon Route 53 and on your internet facing load balancer that are eligible for internet services monitoring. You can even change the deep discovery settings by accessing the link provided in the page.
- When you click on the AWS tab in the Site24x7 dock, the recently added AWS account will be selected by default and a drop down menu will be activated.
- Select any AWS service to navigate to the monitor listing page. For example, if you select EC2 instance from the drop down, first you'll get to see the monitor status information, where the discovered EC2 instance monitors are grouped together based on their operational status.(Up, Trouble, Down, Configuration Error, maintenance). Below that, you'll find a list view of all the discovered EC2 instances that are currently being monitored. A high-level performance overview - CPU utilization, Memory, and Disk I/O activity, are also displayed along each listed EC2 instance. You can additionally view detailed metrics of each instance listed by clicking on it.
Disable one or more AWS services from being discovered
If you want to disable rediscovery for one or more services, we suggest you to come and edit the “Services to be discovered field” in the Integrate AWS Account form. Thus you can disable rediscovery for certain services and and still keep your AWS account integrated with Site24x7.
- Select AWS > Inventory Dashboard of the monitored AWS account >
 > Edit
 - In the edit Integrate AWS Account page, uncheck the check box corresponding to the service which you want to eliminate from discovery.
To remove your AWS account completely from Site24x7
First, select AWS > Inventory Dashboard of the Monitored AWS account > ![]() > Delete
> Delete
Then, login to your AWS IAM console > click on Roles > select the Role you have created for Site24x7 > Click on Role Actions and proceed to delete.
if you have connected your AWS account via key based access then, login to your AWS IAM console > click on Users > select the IAM user you have created for Site24x7 > and click on delete.
When you delete you AWS account monitor from the Site24x7 console all your related AWS resource monitors will be removed along with it.
Related Articles
- Enable Access to your AWS Account
- Enable access to your AWS account with CloudFormation stack
- Enable Access to your accounts using a CloudFormation stack and Control Tower lifecycle events
- Configure Notification Channels and Thresholds
- Required Policies and Permissions
- Supported Polling Intervals
- Advanced Configurations
-
On this page
- Connect your AWS Account via Role-based Authentication
- CloudFormation IAM role-based access
- Connect your AWS Account via Key-based Authentication
- Discovery options
- Filter AWS resources
- ExcludeInclude Resource From Discovery
- Editing the advanced discovery options
- Configure notification profile user groups and thresholds
- Discover AWS Resources
- To remove your AWS account completely from Site24x7